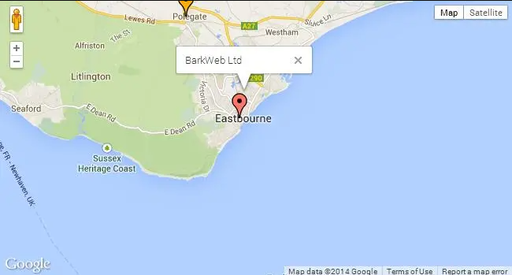
One of the newest plugins we have added to our CMS is the Google Map plugin. Yes you can use the Google provided embedded code if you prefer for simple maps, but our plugin makes it easier if you want to customise it slightly, like adding multiple pins for example.
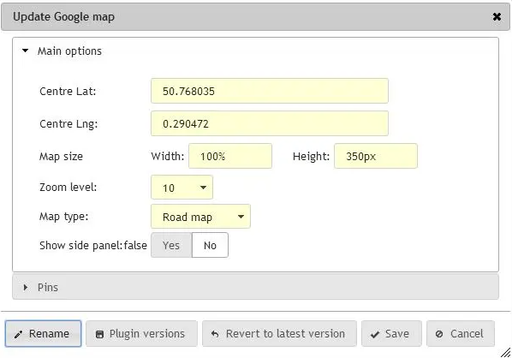
Ok, let’s say you’ve just dropped a brand new Google Map plugin, found under the Map’s section of plugins. You are prompted with the Main Options. If you don’t have Map Plugins under your CMS Plugins, then give the office a call and we can activate it on your website.
Main Settings
Your first options are the Centre Latitude and Longitude settings. This will centre the location in the middle of the plugin. Ideal if you don’t want your pin to be the centre of the map so you can show other landmarks. It needs Latitude and Longitude coordinates to work out the position on the map. To get these, you can visit www.latlong.net. Click on the map here to select a centre, then enter the coordinates into your plugin.

Next you have the Map Size, this is the overall size of the map. This comes in handy for adjusting the size of the map within the plugin container. By default, it will fill 100% of the width and a height of 350 pixels.
Adjusting the zoom level is self-explanatory. The lower the number, the further you zoom out.
Map type allows you to switch between the various views Google provide, like Satellite and Road Map.
Sidebar
Another option is the Sidebar which will display a list of pins you have added. Sidebar is switched off by default. If you switch this on, it’ll display extra options. These extra options are the Alignment, which means your sidebar can be either side or the map, or positioned at the bottom of the map. The Sidebar Zoom Items option will alter the zoom level of the map once an item in the sidebar is clicked. This is different from the default Zoom Level selected earlier.
Adding and Editing Pins
Next we come to adding pins. You can display the map without any pins if you prefer, but we think most of you would want at least one pin on display. Click Add Pin to add your first and enter the information required
Name is easy enough, it’ll display in a popup window over the maps pin.
Enter its Latitude and Longitude coordinates like you did for the Centre Map settings earlier.
The URL setting is optional. By default, if you have your sidebar showing, the link will slide the pin into view and zoom to the set level. If you enter a URL, it’ll navigate to that URL instead.
Next you and select a pin from the options given. If none of these excites you, you can enter the URL of your own pin. Otherwise we have given you a link to a directory of Google Markers from an external site. Grab the URL from there and paste it into the Marker textbox.
..and Finally
Click save to add the pin to your list. Repeat this until all your required pins have been added, then save the Plugin.
