Simple, easy, and free.
This method for tracking phone calls and email clicks taking place on your website is completely free, does not require hours of coding, and doesn't rely on changing your phone number to a forwarding number that your customers then find really confusing.
It's a simple, easy, and free method that uses Google Analytics and Google Tag Manager to track specific events that occur on your website.
Throughout this step by step guide, you will learn to:
- Track phone calls on your website
- Track email clicks on your website
- How to setup Google Tag Manager
- How to integrate Google Analytics with Google Tag Manager
- How to setup conversion tracking for phone calls and email clicks
- How to install Tag Manager on Jolojo, our go-to website CMS
If you'd prefer not to read through this guide, but want call and email tracking on your website, then get in touch and we'll happily set this up for you.
Why bother tracking phone calls and emails?
In basic terms, you'll be silly not to. It's simple to set up, easy to understand, and free. So, why not?
In real terms, call tracking and email tracking is helpful in so many ways. For example:
- It's useful to know how many calls and emails the website actually generates.
- It gives you a clearer idea of audience engagement and behavior on your website.
- Your sales teams may find the information useful and helpful in attributing conversions to specific marketing channels.
- It's helpful in measuring the effectiveness of marketing.
- You can analyse the effective areas of your website design to make informed decisions around user experience.
- Tracking these events reduces bounce rates, a debated ranking signal.
Call tracking, and email tracking, will appear in your Google Analytics dashboard, and look like this.
![]()
Why are we sharing this information with you, for free?
Hopefully, this guide gives you a flavour of what we're about. At BarkWeb, we strive to be helpful to anyone who is committed to understanding their website better, or who wants more for their business across the web. We're firm believers in trading successfully online, especially in today's world where pandemics can lockdown local communities for months. How else is the economy expected to run? We're believers that the online economy will pick up any gaps that locking down the high street will create.
Going back a few years, when we first decided to implement call tracking on our client websites, we remember how complicated and difficult it was to find answers.
We were so determined to find a solution that we were learning to code our own method of call tracking.
We'd been in consultation with Google Gurus around the subject for weeks, none of them had the answers we were seeking.
When we finally discovered a way we could use Google Tag Manager to track phone calls, and emails, and many other events for that matter, it was both a gratifying success that we could now provide this information to our clients, but also we were gobsmacked with how easy it is to set up.
At the time, there were no online guides on how to set this up, so we took it upon ourselves to publish this information to the benefit of all.
1. Tracking phone calls on your website
Step 1: Creating a Tag Manager container
Requires: Google Analytics, Google Tag Manager
Login to Google Tag Manager using the same account that you use for Google Analytics.
Under the Accounts tab, press Create Account
You should be presented with the below interface. Make the account name something memorable (usually the name of the company or website). And make sure you setup the Container to the root domain that you're installing Google Tag Manager onto, and select Web as the target platform.
Note: Please ensure you read through all of the Tag Manager terms and conditions before advancing.

Step 2: Installing Google Tag Manager on your website
Once you have selected a web container, a popup is going to display with instructions on how to install Google Tag Manager onto your website.

Important note: You are going to want to replace Google Analytics on your website with the new Tag Manager script. If you keep both Google Analytics and Google Tag Manager scripts on your website at the same time, you could end up with some inaccurate and erroneous data.
If you’re using WordPress, there are tons of plugins that allow you to install Tag Manager with ease. Alternatively, if you’re on Squarespace, there are plenty of guides available to help you install Google Tag Manager on your site.
If you’re a BarkWeb client already, you'll already have this set up as standard. Want to find out more about your Tag Manager account? Give us a call on 01323 735800 and we'd be happy to answer any questions you have!
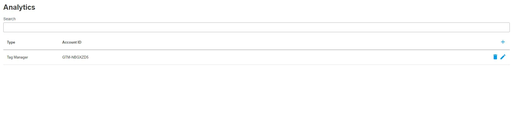
Alternatively, if you're on our BarkWeb CMS2 or Jolojo CMS, and don't currently use Tag Manager, then simply copy your Tag Manager account ID (starting with GTM-) then paste this into the ‘Analytics’ tab, choosing Google Tag Manager from the dropdown menu. Here's the how a visual screenshot to help guide you to the relevant area in the CMS.
And then you'll need to update the Tag Manager setting to the correct GTM code, which you'll find in your Google Tag Manager container or installation guide.
Remember to check that Tag Manager is deployed on all pages! If GTM is not configured correctly across all pages, then your data might be inaccurate.
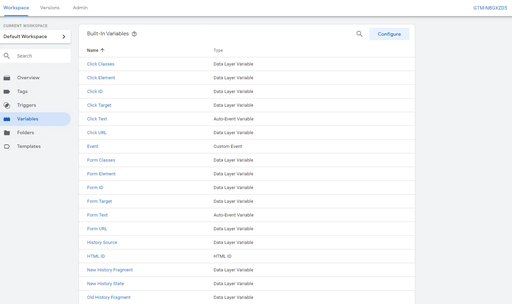
Step 3: Setting up variables within Google Tag Manager
Next, we're going to ensure you are configured to track the right variables for your website. For example, you might want to ensure your Tag Manager can track Clicks, or Forms, or any outbound clicks that navigate away from your website.
Click on the Variables tab in the left-hand-side menu navigation.
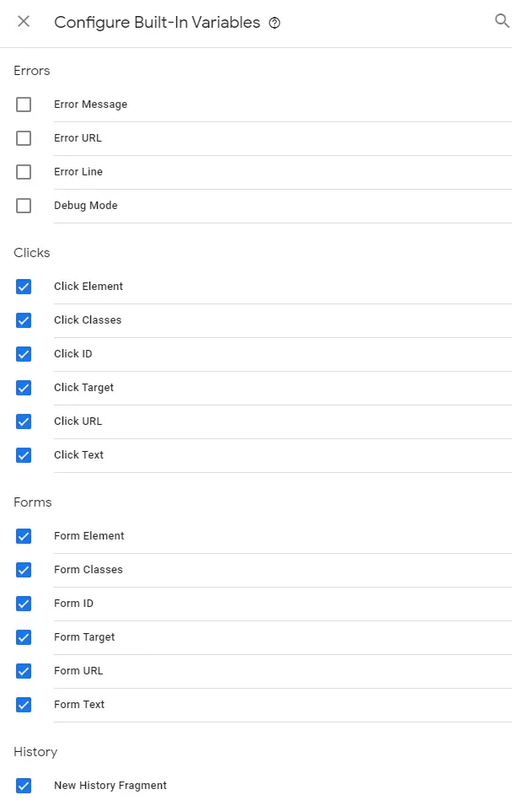
Click the Configure button to set up the built-in variables. These are common variables that many websites would want to have set up. For example, you'll want to configure the built-in variables for Clicks and Forms. And if you're website is built on Jolojo, you'll also want to tick the History variables too, because Jolojo is a single-page application (SPA) and delivers pages in a slightly different way to ensure fast page load speeds.
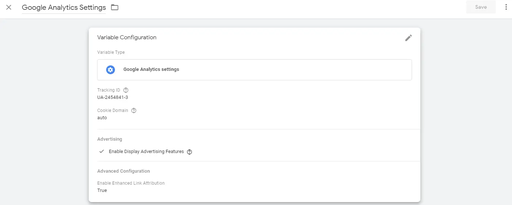
In addition to the Built-in Variables, you will need to configure a User-defined Variable for your Google Analytics setting.
Click the New button next to User-defined Variables, and give this new variable a title. We suggest setting it to either "Google Analytics setting" or specifically the UA- code for your Universal Analytics account in Google Analytics.
You'll then need to configure the variable to be a Google Analytics setting and paste in your tracking ID from Google Analytics, found under the Property Settings and usually starting with UA-XXXXXX-XX.
Step 4: Setting up triggers to "listen" for events
This next step will essentially enable your Tag Manager to listen for broad events taking place on your website in general. This forms the foundation for more complex tracking. For example, if you set up a trigger for All Clicks then your Tag Manager account will effectively listen for any click occurring anywhere on your website, enabling you to then build deeper, more relevant, click tracking should you need it.
Step 5: Creating a tag for tracking all entrances and pageviews
To make sure your Tag Manager meets the minimum requirements of tracking all entrances and pageviews you will need to set up the first tag to effectively replicate the tracking that the standard Universal Analytics code achieves when simply using Google Analytics without Tag Manager.
To set this tag up, all you need to do is go to Tags.
Name this tag "GA - Entrances" if you're on Jolojo, or any other SPA, or "GA - Pageviews" if you're on CMS2, WordPress, or most other basic content management systems. By marking the tag "GA -" you indicated that this tag is for Google Analytics. The reason for this is because you can setup Tags for a lot of other reasons, and keeping some form of labeling in the title of the tag itself will help in organising your tags in the future.
When choosing the tag type, we're going to be using Universal Analytics Google Analytics and we're going to be using the User-defined Variable for your Google Analytics settings that we set up earlier.
The trigger for this tag will be All Pageviews.
If you're on CMS2, Wordpress, or most other standard CMS systems then you have now effectively replicated the standard Google Analytics tracking of monitoring entrances, bounces, time on page, pages visited, and many other audience and behavioral metrics that you can find in Google Analytics as standard.
If you're operating a single-page application, like websites deployed using Jolojo CMS, then you'll need to add an additional tag to track additional pageviews after the initial entrance. This can be done by setting up a second tag, named "GA - Pageviews" to be using the same Universal Analytics settings as the "GA - Entrances" tag, but instead of triggering on all pageviews, this tag will trigger on All History Changes.
Step 6: Publishing the container and testing
Once both of these tags have been set up, you should Publish the Container and enter the Preview mode. Previewing the published container allows you to test and debug the tags you've created.

Note: Now you're in a position to effectively replace standard Universal Analytics on your website with Google Tag Manager. From here on in, if you operate both Universal Analytics and Tag Manager on your website, you may see inaccurate data so it's best to simply remove Universal Analytics from your website, bearing mind we have now set Tag Manager up to perform the same basic function as Universal Analytics.
Now that you're in Preview mode, if you visit your website you should see a Preview modal on-page, usually pinned to the bottom of your browser.

Using Preview mode allows you to see how the Tag Manager listens for specific events and triggers, and will assign any configured triggered events to a specific tag.
As we're guiding you through how to track calls on your website, let's click the phone number to see what information Tag Manager can pick up from this specific interaction on the website. Usually, a browser will identify phone number schema as an <a href="tel:> link, this is mostly only relevant to devices with phone capabilities, making it easier for anyone to connect by simply tapping the number, or more commonly known as Click to Call.
If your website displays a phone number, we would strongly advise you to configure the phone number to click to call. Bear in mind that, if your audience is international, you should use your country code within the link. For example, BarkWeb's phone number would be coded in this manner:
<a href="tel:+441323735800"> 01323 735 800</a>
Tag Manager should identify this specific information for any interaction with your phone number, meaning we can now create a tag to specifically track these taps of the phone number by any user and display the information in Google Analytics.
If you haven't set a href for your phone number yet, simply create a link to your phone number starting with "tel:" and it will perform the same function on all phones and browser-based VOIP software to call the number.
Step 7: Creating a trigger that fires on any phone calls in Google Tag Manager
Now that we understand what Tag Manager can listen to and detect on Click to Call interactions, it's possible for us to set up a tag to track this information.
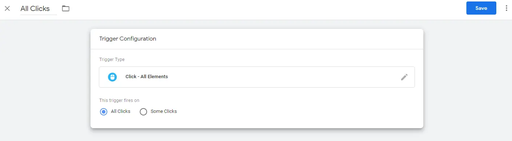
Back in Tag Manager, you'll want to first create a Trigger, go to the Triggers tab, and create a new trigger with the following configuration:
Trigger Type: Clicks - All Elements
Trigger firing on Some Clicks
Fire the trigger when an Event occurs and all these conditions are true: Click Element contains tel:

Once you're done, click the Save button.
Step 8: Creating a tag that uses the Click to Call trigger in Tag Manager, and passes the event to Google Analytics
Now that a trigger is set up, we can create a tag that fires on any Click to Call event on the website, and passes the data to Google Analytics.
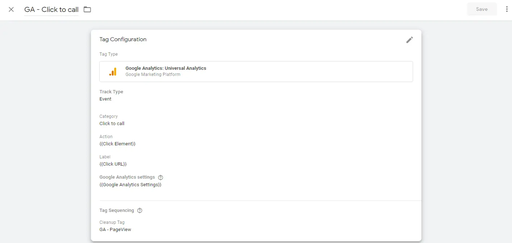
Click on Tags and Create a New tag. Name the tag "GA - Click to Call".
This tag will be an Event tag, make sure to select the User-defined Variable for your Google Analytics settings and add the newly created Click to Call trigger, so that this tag fires on all these events.
To pass Google Analytics the most relevant information, we like to categorise the event as a Click to Call, label the action as the {{Click Element}} and then add an additional label for {{Page Path}}. This means we will see what phone number was dialed, and on what page the event occurred. Useful data for analysing the effectiveness of your web pages.
Step 9: Testing your new "Click to Call" tracking
Publish and submit the new workspace, so that this version of Tag Manager is the current version being used.
If you're still in Preview mode, you may need to refresh it. If you're not in Preview mode, then now is the time to enter Preview mode so that you can test your tags and debug any issues with your tags or triggers.
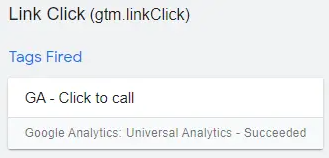
Any tags fired on this page will be clearly marked under Tags fired on this page: whereas any tags not fired will also be clearly marked under Tags not fired on this page:.
To test your new Click to Call tracking, simply click a phone number anywhere on the website and your newly created Click to Call tag should fire, usually as a gtm.click or Link Click.
The beauty of this tag is that it will track all phone numbers, so if you have multiple phone numbers on your website this single tag will track all of them, and pass the data into Google Analytics in an elegant manner, segregating between each phone number and also the pages that users called your from. Google Analytics will automatically track information such as date and time of the event, so it's possible to use this information to understand your marketing channels and attribute calls on your website to specific marketing channels, advertising, or events.
Step 10: Creating goals on Google Analytics, so that phone calls are recorded as conversions
Measuring phone calls as a conversion often makes sense, as these events are often high in intent, and could include potential sales, leads, or customers trying to get in touch with your business.
If your website measures any enquiries as conversions, then we would advise you to also measure phone calls as a conversion.
Log in to Google Analytics.
Click on Admin.
Under the View tab, click on Goals.

It's ok to use a templated Goal setup, for example, Inquiry > Contact us.
Try and describe the Goal in a logical way that matches the tag in Tag Manager, for example:
Name: Click to Call
Type: Event
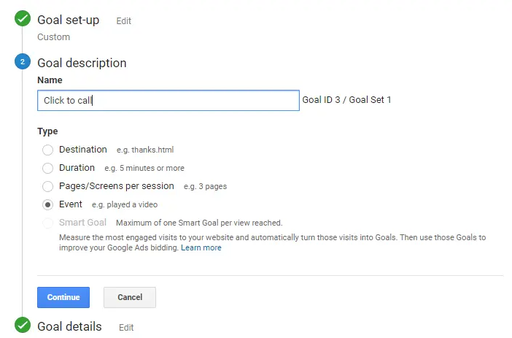
This next step is the critical data, you want to match the Goal details to the tag in Tag Manager. If you've followed the instructions, you'll have set the Category in Tag Manager to "Click to Call", so this will be what we set the Category to in Google Analytics.
As the action and label are dynamic i.e. {{Click Element}} and {{Page Path}} respectively, you can leave these fields blank and this data will pull through automatically.

Save this Goal.
Now that this Goal is set up, you can test it in Google Analytics using Real-Time tracking.
That's it! Click to Call event tracking is now fully set up and configured on your website.
Further reading: Google Tag Manager can be used to track any activity/clicks on your website using this method, including but not limited to:
Email clicks
Phone number clicks
Form submissions and interactions
Any button or CTA clicks
External link clicks, for example to social media channels or third-party links
Internal link clicks
Searches
... Pretty much any and every event possible on your site!
If you have any questions, please get in touch.
Check out our SEO page for further information on SEO services and how they can help improve the engagement, traffic and revenue from your website, with extensive examples of successful SEO. We even have a free SEO auditing tool should you wish to improve your website on your own, or to get an idea of what Google might see as a potential issue on your site.
Thanks for reading!